This tutorial starts with a brief overview and then goes into general usage of Dbus and lastly using Dbus with UDisks2 to get notified if a USB storage device has been inserted.
Update:
I initially wrote this article with the title "Python detection of USB storage device". After some time of working with UDisks2 and Dbus however I found out that the code tends to be very ugly and unexpected behaviours occur (not sure if it's because of Dbus or UDisks2). So if you want to control an input/output device like a USB device or get events, I recommmend you use pyudev straight away! I will probably write an article on how to use that too. If you want to use DBus for educational purposes or want to use it maybe with some other software, please continue reading.
The daemons checkin' out your USB
There are two main daemons running on Ubuntu (and probably all major distros) that deal with connecting/disconnecting devices.
The one is udisks which deals with storage devices like USB sticks and the like. The second is udev, a daemon that deals with all kind of devices from PCI boards to the keyboard and mouse (including everything that udisks deals with).
Let's prove that they exist and that they are running on our system:
[sourcecode light="true"]
manos@box:~$ ps ax | egrep 'udev|udisks'
352 ? S 0:00 upstart-udev-bridge --daemon
357 ? Ss 0:00 /lib/systemd/systemd-udevd --daemon
2844 ? Sl 0:00 /usr/lib/gvfs/gvfs-udisks2-volume-monitor
2850 ? Sl 0:00 /usr/lib/udisks2/udisksd --no-debug
..
[/sourcecode]
Now, depending on how old your Linux distribution is you might have
udisks or udisks2 (fourth process) and then you have the udev daemon (second process). But what do these daemons do? Well let's check for ourselves, shall we?Let's monitor our USB
Open two terminals. In the first type:
[sourcecode light="true"]
udisksctl monitor
[/sourcecode]
And on the second one type:
[sourcecode light="true"]
udevadm monitor
[/sourcecode]
These are front-ends for the daemons udisks and udev respectively.
Now, while looking at the two terminals we do the below:
- First remove or put in a non-storage device like a mouse or a keyboard (USB mouse/keyboard works fine).
- Now put in or remove a storage device (USB stick, external hard disk, etc).
You will notice that for the first action, udev prints a bunch of stuff while udisks does nothing. For the second case where we mingle with a storage device, both services print out stuff.
For example when I insert a USB stick I get this on the udisk terminal:
[sourcecode light="true" lang="shell"]
manos@box:~$ udisksctl monitor
Monitoring the udisks daemon. Press Ctrl+C to exit.
11:31:00.793: The udisks-daemon is running (name-owner :1.76).
11:31:05.850: Added /org/freedesktop/UDisks2/drives/Samsung_1040d8f1f9b92b56e6d1af1d7a0dd4c82781
org.freedesktop.UDisks2.Drive:
CanPowerOff: true
Configuration: {}
ConnectionBus: usb
Ejectable: true
..
[/sourcecode]
and this on the udev terminal:
[sourcecode light="true" lang="shell"]
manos@box:~$ udevadm monitor
monitor will print the received events for:
UDEV - the event which udev sends out after rule processing
KERNEL - the kernel uevent
KERNEL[2569.327243] add /devices/pci0000:00/0000:00:14.0/usb2/2-3/2-3.4/2-3.4.2 (usb)
KERNEL[2569.328960] add /devices/pci0000:00/0000:00:14.0/usb2/2-3/2-3.4/2-3.4.2/2-3.4.2:1.0 (usb)
KERNEL[2569.329026] add /devices/pci0000:00/0000:00:14.0/usb2/2-3/2-3.4/2-3.4.2/2-3.4.2:1.0/host7 (scsi)
..
[/sourcecode]
This makes it clear that udisks records only changes to storage devices like USB sticks and hard disks. udev on the other hand monitors any device that can connect/disconnect to your PC.
On a sidenote (in case you're wondering) the
KERNEL[blah blah] messages that appeared on the udev terminal, are Netlink messages sent from the kernel to udev.The bigger picture
Now, we know that udisks is just like udev but with the difference that udisks plays with storage devices.
It turns out that udisks actually uses udev itself:
DEVICE INFORMATION
       udisks relies on recent versions of udev(7) and the Linux kernel.
So what does udev do then? Well udev's main work is to populate the
/dev folder on your root directory. So it's kind of a discovering daemon that tells the kernel what devices are connected and where. That's all!Below you can see the bigger picture of how everything works together.

udev, udisks and dbus, they are all daemons running in the background from the time you start your computer.
Netlink and Dbus
Netlink and Dbus are two different protocols used for processes to talk with each other. In the first case the kernel communicates with udev and in the second case udisks with the dbus daemon. Many applications use the dbus protocol like Unity, NetworkManager, Skype, and pretty much all Gnome apps.
Notice that the dbus-daemon that is running all the time is part of the dbus protocol. I talk more about how dbus works, later so you get an understanding as to why a daemon is needed.
What's udev?
The kernel uses the Netlink protocol (essentially UNIX sockets) to send messages to udev daemon. These messages are the ones we saw earlier when we typed
udevadm monitor in the terminal. The way this works is by udev setting up some specified rules that the kernel reads at bootup. Then whenener a device is connected to your computer, a message to udev is sent from the kernel.udisks uses the udev library and thus has access to all this. If you can use udev then you can pretty much access the kernel messages sent to udev.
And what about that dbus thingy?
The dbus daemon is not specific to udisks only. dbus daemon runs always and is a generic solution for processes to exchange information. NetworkManager for example uses this, so someone could create a program that automatically gets notified if an ethernet card is inserted by simply using dbus. All programs that use dbus, have access to each other. Luckily for us, udisks uses dbus :)
Choosing between udev, dbus and direct kernel messaging
From all the above it should become apparent that there are three main ways we can get notified about a USB insertion:
- Talk directly with the kernel with Netlink messages. In this case we essentially place ourselves in udev's position.
- Use the udev library like udisks does. In python this is done with using
pyudev. - Use the Dbus protocol to talk with udisks directly.
There are pros and cons with all these three approaches. I will explain a bit on all three starting from the lowest level to the highest level.
Kernel
The kernel way is probably the best but is probably a hell to get working since it's so low-level. You need to deal with raw sockets since that's how Netlink communication is done. The good thing with this approach is that you are not dependent on anything more than the kernel itself. So it's pretty hard that something will break and you can always be sure that your solution will work for any distribution.
udev
udev is probably the best practical solution. It handles the messages sent from the kernel so we don't need to handle them. We only use a udev library and that's all. From what I am aware all major Linux distributions use udev so you're not going wrong with this solution. The only bad thing (and this is my own opinion) is that the udev library bindings for Python don't come with Python so you need to install them on your system on your own.
Dbus
Dbus uses itself udev as we mentioned earlier so it has already a dependency. However as we sayied, pretty much all distros use udev so that shouldn't be a problem. The main good things with Dbus is that the dbus library comes with Python (both 2 and 3) so you can start coding directly without having to install a bunch of stuff. An extra good thing is that maaaaaaany programs use the Dbus protocol so once you learn it, you can potentially access a lot of things. The bad thing with dbus is its ugly design (my opinion again).
In this tutorial I will talk about dbus since it's one of the things that you learn once and can use in many different situations in the future.
How dbus works
Choosing Dbus means we will have to learn a bit on how Dbus protocol works and then try and find out how udisks uses dbus. I will try to make this as easy as possible even if it's a quite hard task considering how sparse information is and how ugly some things in dbus are.
So what exactly is dbus? How does it connect things together? I think the easiest way to explain, is by showing you a diagram.

The dbus-daemon keeps a sort of a freeway which all programs can access. In our diagram, udisks, NetworkManager and our python program can share information between them. The dotted yellow rectangles in the diagram are representing the messages exchanged between the programs.
There are actually two freeways (buses)
Dbus uses two different freeways like the one I mentioned above. That also means there are two dbus-daemon running. One is a system-wide freeway and the other is a session-wide freeway. In this context, session is the duration of time that a user is logged in.
These dbus daemons are running:
[sourcecode light="true"]
ps ax | grep dbus-daemon
844 ? Ss 0:00 dbus-daemon --system --fork
2451 ? Ss 0:00 dbus-daemon --fork --session --address=unix:abstract=/tmp/dbus-IP8uQnHdYR
2545 ? S 0:00 /bin/dbus-daemon --config-file=/etc/at-spi2/accessibility.conf --nofork --print-address 3
[/sourcecode]
As you see there are two dbus-daemon running, or three in this case. Omit the third one (no idea what that is). The two main daemons are the first two. Notice the
--system in the first one and the --session in the second. These are exactly what you might guess they are.. The first one keeps the system-wide freeway and the second keeps the session-wide freeway. I think it's time we drop the 'freeway' word and use bus instead.Now each freeway has its own rules. Furthermore, each program using dbus, can setup its own rules. All these rules are of the type "root can send this type of message" and "any user can access this type of message but not send this type", etc.
An important thing to notice is that surprisingly there is a dbus-daemon running on your system. This daemon is used to put all programs using dbus communication together. So when we will try to connect to program A via dbus, we will actually connect to dbus-daemon which acts as a mediator.
So how do we use this module? I give below two examples. First I try to access NetworkManager and then udisks. I do this to show you how the workflow is and as a proof that you can use dbus for more than merely USB insertion scenarios.
Listing programs connected to dbus
The simplest way to find which programs are connected to dbus is from Python.::
[sourcecode light="true"]
>>> import dbus
>>> bus = dbus.SystemBus()
>>> bus.list_names()
dbus.Array([dbus.UTF8String('org.freedesktop.DBus'), dbus.UTF8String(':1.7'), dbus.UTF8String(':1.8'), dbus.UTF8String(':1.9'), dbus.UTF8String('org.freedesktop.ModemManager1'), dbus.UTF8String('org.freedesktop.NetworkManager'), dbus.UTF8String('com.ubuntu.Upstart'), dbus.UTF8String('org.freedesktop.Accounts'), dbus.UTF8String('org.freedesktop.RealtimeKit1'), dbus.UTF8String(':1.60'), dbus.UTF8String(':1.61'), dbus.UTF8String(':1.62'), dbus.UTF8String(':1.40'), dbus.UTF8String('com.canonical.NMOfono'), dbus.UTF8String(':1.85'), dbus.UTF8String(':1.63'), dbus.UTF8String(':1.86'), dbus.UTF8String('org.freedesktop.PolicyKit1')
..
[/sourcecode]
That will list all programs connected to the system bus. In practice, this means that we can connect to any of these programs (as long as we connect to the right bus ofcourse)!
In the same fashion we can list programs connected to the session bus (these are probably much more):
[sourcecode light="true" lang="python"]
>>> import dbus
>>> bus = dbus.SessionBus()
>>> bus.list_names()
dbus.Array([dbus.UTF8String('org.freedesktop.DBus'), dbus.UTF8String(':1.128'), dbus.UTF8String('com.canonical.Unity.Launcher'), dbus.UTF8String('org.freedesktop.Notifications'), dbus.UTF8String(':1.7'), dbus.UTF8String('com.canonical.indicator.datetime'), dbus.UTF8String(':1.8'), dbus.UTF8String(':1.9'), dbus.UTF8String('org.gtk.Private.AfcVolumeMonitor'), dbus.UTF8String('com.canonical.indicator.sound'), dbus.UTF8String('org.gtk.vfs.Daemon'), dbus.UTF8String('org.pulseaudio.Server'), dbus.UTF8String('com.canonical.indicator.application'), dbus.UTF8String('com.canonical.Unity.Webapps.Service'), dbus.UTF8String('com.ubuntu.Upstart'), dbus.UTF8String(':1.80'), dbus.UTF8String('org.gnome.SessionManager'), dbus.UTF8String(':1.81'), dbus.UTF8String('org.gnome.evolution.dataserver.Sources2'), dbus.UTF8String('com.canonical.indicator.session'), dbus.UTF8String('com.canonical.hud'), dbus.UTF8String(':1.82'), dbus.UTF8String(':1.83'),
..
[/sourcecode]
Notice that in some cases we get domain looking strings and in some cases we get weird numbers like ':1.83' and ':1.128'. These are pretty much the same thing as domains and IP on the internet. In this case however instead of the domain/IP pointing to a host, they point to a program on our computer. Ofcourse the number ":1.128" is quite cryptic and there's actually no way to know which program it resolves to. But that is fine since the programs that are meant to be accessed, are given domain-like names just so that we can find them easily.
The right tools
Now that we know which program we want to connect to, we have to somehow find out how and what we can access from it. For this I will use a tool called d-tree. This tool gives you an overview of all programs connected to dbus and also give you a list of things that you can access.
On Ubuntu you can install this program directly with:
[sourcecode light="true"]
sudo apt-get install d-feet
[/sourcecode]
On a side-note, you might feel tempted to access all this via Python or by using the terminal. Do your self a favour and don't. I already took that path and there are just too many issues you might run into that you'll never be able and truly understand how things run without getting in the low-level source code.
Running a program's method
Whenever you want to access a program's method or property, you need exactly four things:
- The program's domain name
- Object path
- Interface
- The method or property (signals are a special case so will talk about them separately)
All these things are pretty random and make little sense. However that's the API that we have for DBus so if you want it you have to bare with me. You just have to learn how to find each one of them and then how to use them in your Python program to access the property or method you want. You will be using d-feet to locate all these four things!
As an example I will take NetworkManager. Just look below..

The method I want to run in this case is
GetDevices(). However in order to run it I have to locate all the other things: the program, the interface and the object path. Just looking at the snapshot it's easy to see where all these are located. As said, you just have to get used to finding them for any program.Translating all this to code looks like this:
[sourcecode light="true" lang="python"]
import dbus
bus = dbus.SystemBus()
obj = bus.get_object('org.freedesktop.NetworkManager', '/org/freedesktop/NetworkManager')
obj.GetDevices()
[/sourcecode]
Where 'org.freedesktop.NetworkManager' is the program's domain and '/org/freedesktop/NetworkManager' is the so called object path. There is no real logic as to what an object path is. It's just some bad implementation in the core, where someone tried to bring object oriented coding into Dbus which is written in C. What came out of this effort is this monster of illogical terms that just don't fit together and just complicate things. However we have to learn all this if we are to use Dbus.
Output from the above code:
[sourcecode light="true" lang="python"]
dbus.Array(
[
dbus.ObjectPath('/org/freedesktop/NetworkManager/Devices/0'),
dbus.ObjectPath('/org/freedesktop/NetworkManager/Devices/1')
],
signature=dbus.Signature('o')
)
[/sourcecode]
Now if you are a person that spots things, you probably noticed that we didn't enter the Interface (which happens to look exactly like the program name) anywhere in our code. So how come the code works when I just stated that we always need 4 things? Well.. it's one of those bad designs. The reason it works is because the dbus library tries to "guess" which interface you want to use. In this case it was right. However many times it doesn't work and you will run into problems that are really hard to debug. So a friendly advice is to ALWAYS give the 4 things mentioned. FOUR IS THE NEW FIVE.
In our case the fail-safe code would be:
[sourcecode light="true" lang="python"]
import dbus
bus = dbus.SystemBus()
obj = bus.get_object('org.freedesktop.NetworkManager', '/org/freedesktop/NetworkManager')
iface = dbus.Interface(obj, 'org.freedesktop.NetworkManager')
iface.GetDevices()
[/sourcecode]
Same output as before. But use this convention and you will never run into debugging nightmares. After all, explicit is better than implicit and that is especially true in this case.
Listing devices with udisks
Building on top of what we did with NetworkManager we continue but this time with UDisks2.
As you might notice, udisks doesn't have a straighforward method that we can call to list all devices. So someone has to dig through the things, read UDisks2 dbus API or simply google. Luckily for you, I did the digging.

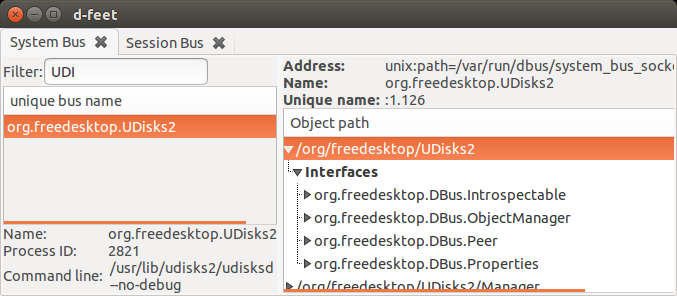
From the d-feet snapshot we can see directly the four things we need: the program domain (org.freedesktop.UDisks2), the interface (org.freedesktop.DBus.ObjectManager), the object path (/org/freedesktop/UDisks2) and lastly the method (GetManagedObjects()).
And the appropriate code is:
[sourcecode light="true" lang="python"]
import dbus
bus = dbus.SystemBus()
obj = bus.get_object('org.freedesktop.UDisks2', '/org/freedesktop/UDisks2')
iface = dbus.Interface(obj, 'org.freedesktop.DBus.ObjectManager')
iface.GetManagedObjects()
[/sourcecode]
You should get a blob of stuff including any mounted drives. Indeed you still have to dig through things but at least you shouldn't be totally lost by now.
Getting properties/attributes
Building on the above, we will try to access some properties of a device. But first have a look at d-feet and pay attention to the fact that if you scroll down you will see the storage devices connected to your computer.

Then we can also see that the device I choose has a bunch of properties.
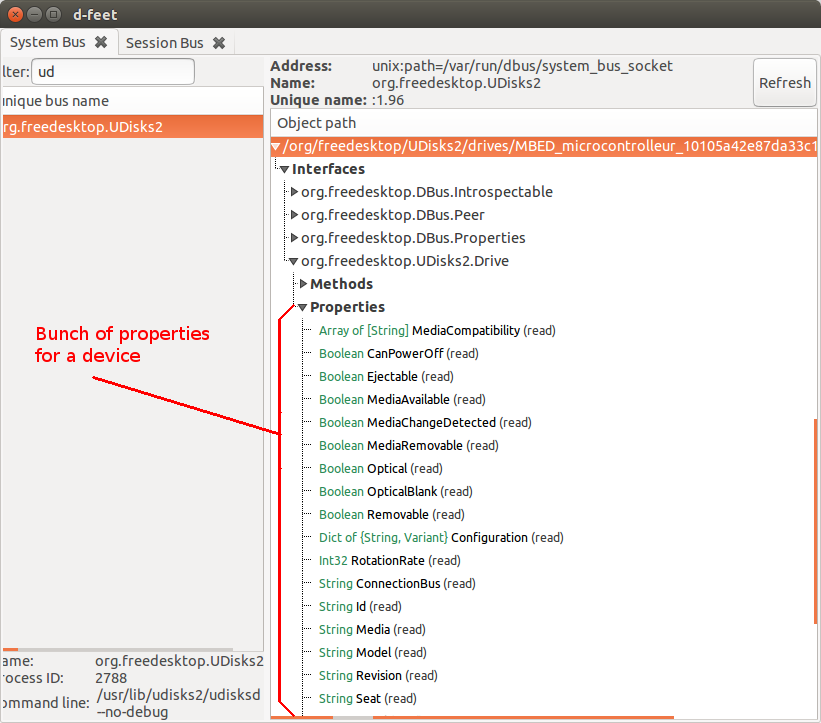
Now the logical thing to access these properties would be to do as we did earlier with the methods. Instead of methods we would just call the properties. And that my friend.. just won't work! (Ugly Dbus, I hate you.)
So in order to access any property of any object we need to use a very specific interface: 'org.freedesktp.DBus.Properties'.
So to not make this too tedious I will give the whole code again:
[sourcecode light="true" lang="python"]
import dbus
bus = dbus.SystemBus()
obj = bus.get_object('org.freedesktop.UDisks2', '/org/freedesktop/UDisks2/drives/MBED_microcontrolleur_10105a42e87da33c103dccfb6bc235360a97')
iface = dbus.Interface(obj, 'org.freedesktop.DBus.Properties') # Here we use this 'magic' interface
iface.GetAll('org.freedesktop.UDisks2.Drive')
[/sourcecode]
Notice that the object path '/org/freedesktop/UDisks2/drives/MBED_microcontrolleur_10105a42e87da33c103dccfb6bc235360a97' has to be replaced with one that actually exists on your computer.
Then we open the correct interface and call GetAll(). The argument to GetAll() is the interface name that you want to get the properties of. As I told many times.. Dbus is so damn confusing! Anyway, the good thing is that the 'org.freedesktp.DBus.Properties' interface has only three methods we need to learn: Get(), Set(), GetAll(). So things can't get more complicated than this.
If we want to access a very specific property we just use Get() instead of GetAll() and pass the interface name followed by the name of the property we want:
[sourcecode light="true" lang="python"]
import dbus
bus = dbus.SystemBus()
obj = bus.get_object('org.freedesktop.UDisks2', '/org/freedesktop/UDisks2/drives/MBED_microcontrolleur_10105a42e87da33c103dccfb6bc235360a97')
iface = dbus.Interface(obj, 'org.freedesktp.DBus.Properties')
iface.Get('org.freedesktop.UDisks2.Drive', 'Id') # Only difference
[/sourcecode]
How about that USB insertion notification? (signals)
We saw how we can call methods but what about the interesting things like getting notified about an event like USB insertion? For this we can use signals.
All a signal is, is an incoming message from UDisks2 telling us that a mountable device has been inserted. From our part this signal will run a function in our code, a so called callback function. If you check in d-feet you will see many types of signals. The one that interests us is
InterfacesAdded() from org.freedesktop.DBus.ObjectManager.So how do we do this? I will get you straight the code for this one and do the explaining afterwards.
[sourcecode light="true" lang="python"]
import dbus
from dbus.mainloop.glib import DBusGMainLoop
DBusGMainLoop(set_as_default=True)
bus = dbus.SystemBus()
# Function which will run when signal is received
def callback_function(*args):
print('Received something .. ', args)
# Which signal to have an eye for
iface = 'org.freedesktop.DBus.ObjectManager'
signal = 'InterfacesAdded'
bus.add_signal_receiver(callback_function, signal, iface)
# Let's start the loop
import gobject
loop = gobject.MainLoop()
loop.run()
[/sourcecode]
If you run the above code, you will get printed things for every disconnection or connection of a storage device. Try plugging in your USB stick and see for yourself.
There are two things worth noticing in the code with signals:
- We import and use a bunch of weird things like gobject and DBusGMainLoop
- We don't need the four things like earlier. We only need to know the interface and the signal (oh and both are just strings)
For our use the only thing we need from these libraries are the so called loops. The loops are needed since someone has to be looping somewhere waiting for the signal to arrive. We could probably create our own loop but I am not so sure how easy it would be. You could take that route if you want, may Zoidberg Jesus guide you the way. Below I mention a bit on what excactly Glib and Gobject is, just in case you're curious and bored to google.
Glib
Glib is a library that originally was developed to be used with Gnome's GTK. However later it split from it so that it could be used on any Linux machine. Many programs use the Glib library since it's it provides so many things that is hard to find (in C) in a general-purpose library. Some things offered are data-structures like hash tables and linked lists (just keep in mind next time you will need any of this).
Gobject
Gobject is built on top of Glib. What it does is merely allow object oriented programming with the Glib. Since Glib is a C library, it doesn't have object-oriented things lik objects, inheritance, classes etc. For that reason Gobject was developed. In our case, the reason we use it is to easily be able and change things on the loop without having to dig inside the C code.
Unblocking the loop
Now the loop above seems to work fine. There is a problem though. Your whole program blocks in this loop. Even if you add 1000 threads, they will all block for some weird reason and only the loop will run.
In order to stop the loop you have to:
- Add the code with the signal on a Python thread
- Initialize internally a thread for gobject (no clue what that does but won't work if you don't do it)
So in practice we just put the whole code above in a separate thread and then we make sure that gobject is calling
threads.init() before we run() the loop.And here is the code with the loop running on its own thread:
[sourcecode light="true" lang="python"]
import threading, time
def start_listening():
import dbus
from dbus.mainloop.glib import DBusGMainLoop
DBusGMainLoop(set_as_default=True)
bus = dbus.SystemBus()
# Function which will run when signal is received
def callback_function(*args):
print('Received something .. ', args)
# Which signal to have an eye for
iface = 'org.freedesktop.DBus.ObjectManager'
signal = 'InterfacesAdded'
bus.add_signal_receiver(callback_function, signal, iface)
# Let's start the loop
import gobject
gobject.threads_init() # Without this, we will be stuck in the glib loop
loop = gobject.MainLoop()
loop.run()
# Our thread will run start_listening
thread=threading.Thread(target=start_listening)
thread.daemon=True # This makes sure that CTRL+C works
thread.start()
# And our program will continue in this pointless loop
while True:
time.sleep(1)
print("tralala")
[/sourcecode]
This is a good starting point for your program. Feel free to copy/paste it :)
Digging further
All this should give you an idea on how to get started. Now the main thing is probably that you have to filter out some signal events since
InterfacesAdded() might run several times for a single unplug or plug-in of a device. Or depending on your case maybe you want to wait for a different signal. Using d-feet this should be rather easy to figure out.The easiest way to do things from my experience is to use d-free and the Python interpreter directly to test things. However if you feel comfortable with ugly complicated interfaces then the UDisks2 dbus API might be of benefit for you.
References
http://dbus.freedesktop.org/doc/dbus-specification.html
https://www.kernel.org/doc/ols/2003/ols2003-pages-249-257.pdf
http://www.freedesktop.org/wiki/Software/dbus/
http://udisks.freedesktop.org/docs/latest/
http://en.wikipedia.org/wiki/Udev
http://en.wikipedia.org/wiki/D-Bus
http://dbus.freedesktop.org/doc/dbus-python/api/
http://doc.opensuse.org/products/draft/SLES/SLES-admin_sd_draft/cha.udev.html
http://free-electrons.com/doc/udev.pdf
http://dbus.freedesktop.org/doc/dbus-python/doc/tutorial.html