Intro
A few days ago I wrote a tutorial on how to setup docker and use it between different machines. Now that was a nice first insight on how to jump-start using docker. It was also a nice way to showcase the possibilities and limitations of Docker.
In this post I will give some practical information on how to use docker as a developer.
Setup
To use Docker for development of software we want mainly three things:
- Have our source code on the host machine. That way we can use GUI editors and whatever tools we want from outside the container.
- Be able to have multiple terminals to the same container. This is good for debugging
- Setup a docker image which we will use for running our program. I will use Django and Python for that.
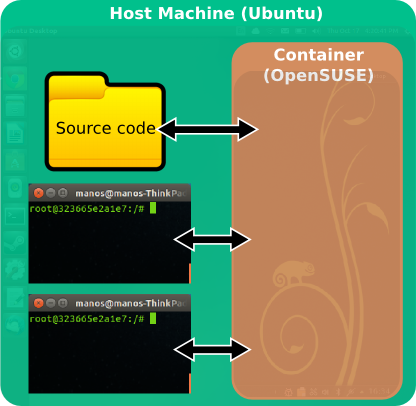
And for the visual brains out there:

As you see in the pic, I am using Ubuntu as my host machine. At the same machine I have a folder with the source code and two terminals. Then I run a container with OpenSUSE. The folder and terminals reside ont he host machine but they communicate directly with the container. I will describe below how to achieve all this.
Multiple terminals
The easiest way to have multiple terminas is to use a small tool called
nsenter. The guide can be found at https://github.com/jpetazzo/nsenter but it sums up to running this one-liner from any folder:[code]
> docker run --rm -v /usr/local/bin:/target jpetazzo/nsenter
[/code]
That installs nsenter on the host machine. After that, we can use it directly. So let's try it. Open bash in a container with ubuntu as our basic image:
[code]
> docker run -t -i ubuntu /bin/bash
root@04fe75de21d4:/# touch TESTFILE
root@04fe75de21d4:/# ls
TESTFILE boot etc lib media opt root sbin sys usr
bin dev home lib64 mnt proc run srv tmp var
[/code]
In the terminal above, I created a file called TESTFILE. We will try to open a second terminal and check to see the file from it.
To use xsenter we need the process ID of the container. Unfortunately we can't use
ps aux but rather have to use docker's inspect command. I open a new terminal and type the below[code]
> PID=$(docker inspect --format {{.State.Pid}} 04fe75de21d4)
> sudo nsenter --target $PID --mount --uts --ipc --net --pid
[/code]
The string 04fe75de21d4 I gave is the ID of my container. If everything went ok, your terminal prompt will change to the same ID:
[code]
root@04fe75de21d4:/# ls
TESTFILE bin boot dev etc home lib lib64 media mnt opt proc root run sbin srv sys tmp usr var
[/code]
See the TESTFILE there? Congrats! Now we have a second terminal to the exact same container!
Share a folder between host and container
Now I want to have a folder on my host computer and be able and access it through a container.
Luckily for us there is a built-in way to do that. We just have to specify a flag
-v to docker. First let's make a folder though that will be mounted:[code]
> mkdir /home/manos/myproject
[/code]
Let's now mount it into the container:
[code]
> sudo docker run -i -t -v /home/manos/myproject:/home/myproject ubuntu /bin/bash
> root@7fe33a71ac2f:/#
[/code]
If I now create a file inside /home/manos/myproject the change will be reflected from inside the container and vice versa. Play a bit with it by creating and deleting files from either the host or from inside the container to see for yourself.
Create a user in the container
It is wise to have a normal user in your image. If you don't then you should create one and save the image. That way the source files can be opened from a normal user on your host - you won't need to launch your IDE with root privileges.
[code]
> adduser manos
..
[/code]
Follow the instructions and then commit your image. That way whenever you load the image again, you will be having user
manos. To change to user manos just type[code]
> su manos
[/code]
All files you create now, will be accesible by a normal user at the host machine. Something else you could do is to somehow
Real life scenario: Python, Django and virtualenv
I wanted to learn Django. Installing Django is commonly made with the package manager pip, but pip has a bad history of breaking up things since it doesn't communicate with Debian's apt. So at some point if you installed/uninstalled python stuff with apt, pip wouldn't know about it and vice versa. In the end you would end up with a broken python environment. That's why a tool called virtualenv is being used - a tool that provides isolation. Since we have docker though which also provides isolation we can simply use that.
So what I really want:
- Have the source code on my host.
- Run django and python inside a container.
- Debug from at least two terminals.
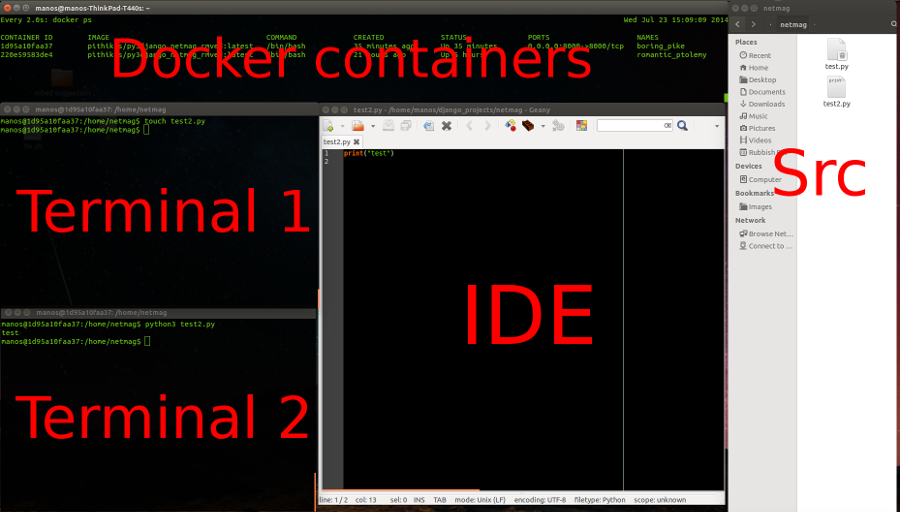
Visually my setup looks as something like this:

I assume you have an image with django and python installed. Let's call the image
py3django.Firstly create the folder where you want your project source code to be. This is the folder that we will mount. My project resides in
/home/manos/django_projects/myblog for example.Once it's created I just run bash on the image py3django. This will be my primary terminal (terminal 1):
[code]
> sudo docker run -i -t -p 8000:8000 -v /home/manos/django_projects/myblog:/home/myblog py3django /bin/bash
root@2fe3611c1ec2:/home#
[/code]
The flag -p makes sure that docker doesn't choose a random port for us. Since we run Django we will want to run a web server with a fixed port (on 8000). The flag -v mounts our host folder /home/manos/django_projects/myblog to the container's folder /home/myblog. py3django is the image I have.
Now we have a folder where we can put our source code and a working terminal to play with. I want though a second terminal (terminal 2) to run my python webserver. So I open a second terminal and type:
[code]
> sudo nsenter --target $(docker inspect --format {{.State.Pid}} 2fe3611c1ec2) --mount --uts --ipc --net --pid
> root@2fe3611c1ec2:/#
[/code]
Mind that I had to put the appropriate container ID in the command above.
Now all this is very nice but admittedly it's very complex and it will be impossible to remember all these commands and boring to type them each single day. Therefore I suggest you create a BASH script that initiates the whole thing.
For me it took a whole day to come up with the script below:
[code language="bash"]
#! /bin/bash
django_project_path="/home/manos/django_projects/netmag" # Path to project on host
image="pithikos/py3django_netmag_rmved" # Image to run containers on
echo "-------------------------------------------------"
echo "Project: $django_project_path"
echo "Image : $image"
# 1. Start the container in a second terminal
proj_name=`basename $django_project_path`
old_container=`docker ps -n=1 -q`
export docker_line="docker run -i -t -p 8000:8000 -v $django_project_path:/home/$proj_name $image /bin/bash"
export return_code_file="$proj_name"_temp
rm -f "$return_code_file"
gnome-terminal -x bash -c '$docker_line; echo $? > $return_code_file'
sleep 1
if [ -f "$return_code_file" ] && [ 0 != "$(cat $return_code_file)" ]
then
echo
echo "--> ERROR: Could not load new container."
echo " Stop any other instances of this container"
echo " if they are running and try again."
echo
echo " To reproduce the error, run the below:"
echo " $docker_line"
echo
rm -f "$return_code_file"
exit 1
fi
rm -f "$return_code_file"
# 2. Connect to the new container
while [ "$old_container" == "`docker ps -n=1 -q`" ]; do
sleep 0.2
done
container_ID=`docker ps -n=1 -q`
sudo nsenter --target $(docker inspect --format {{.State.Pid}} $container_ID) --mount --uts --ipc --net --pid
[/code]
This script starts a container on a second terminal and then connects to the container from the current terminal. If starting the container fails, an appropriate message is given.
django_project_path is the full path to the folder on the host with the source code. The variable image holds the name of the image to be used.You can combine this with
devilspie, an other nice tool that automates the position and size of windows when they're launched.In case you wonder about the top window with all the containers, that's simply a
watch command, a tool that updates regularly a command. In my case I use watch with docker ps. Simple stuff:[code]
> watch docker ps
[/code]
I use this because I personally like having an overview on the running containers. That way I don't end up with trillions of forgotten containers that eat up my system.
Now that you have everything setup you can also run django server from one of the two terminals or whatever else you might want.
No comments:
Post a Comment