It can be hard to remember how to traverse trees by name. It can also be hard to understand the difference between traversing in different ways(postorder, preorder, inorder, level order, etc). I try here to make it easier for the reader to understand the different ways of traversing a binary tree. Intuition is the key to remembering(and visualization ofcourse).
I use the words parents and children for the elements in the tree instead of nodes, root, branches and leafs. I think those words are easier to describe what is going on without getting anyone too confused.
Recursive traversal
I want to firstly point out that this method is commonly called "depth/height traversal". However I use the word recursion as it seems more appropriate to me.
There are three ways to traverse a tree recursively. The only real difference between them is the order we visit the parent node.
- Pre order ------- here we visit the parent in the beginning
- In order --------- here we visit the parent second
- Post order ------ here we visit the parent lastly
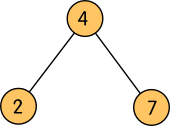
Because recursion is hard to grasp and even harder to have a visual insight of the goings, we will use a simple example to begin with. We start by examining, with all three methods, this binary tree:
Pre order
Here the path we follow to traverse is:
- Parent
- Left child
- Right child
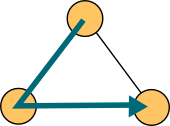
Applied to our example tree:
So if we use pre-order to traverse the example binary tree, then we would get the values(by order we visited them):
[sourcecode light="true"]
4, 2, 7
[/sourcecode]
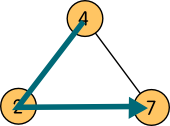
In order
Here the path we follow to traverse is:
- Left child
- Parent
- Right child

Applied to our example tree:
So if we use in-order to traverse the example binary tree, then we would get the values(by order we visited them):
[sourcecode light="true"]
2, 4, 7
[/sourcecode]
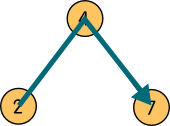
Post order
Here the path we follow to traverse is:
- Left child
- Right child
- Parent

Applied to our example tree:

So if we use in-order to traverse the example binary tree, then we would get the values(by order we visited them):
[sourcecode light="true"]
2, 7, 4
[/sourcecode]
The bigger picture
All this seems simple for a tree with only three nodes. But what happens when we have a huge tree with multiple nodes? Which node would we visit first?
The answers are rather simple but there are not good resources actually to give a good visualization of how a recursive traversing can look like.
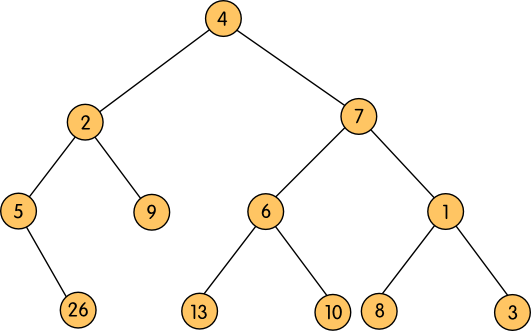
So let's start by taking this big tree:

The trick is to start by seeing see the whole structure as a tree with three nodes. In all three traversing methods we start with the node on the top of the tree: the root node. We thus see that as the parent in the beginning of the traversing. All the rest of the nodes on the left is considered the left child and everything on the right of it is considered the right child.
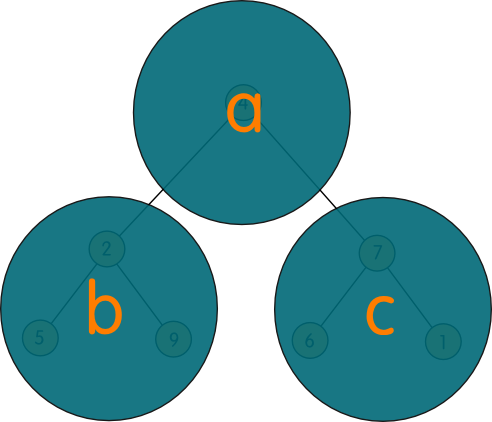
The bigger complex tree has been compressed to a three-node tree. We can now start traversing it with whatever -order traversal method we want.
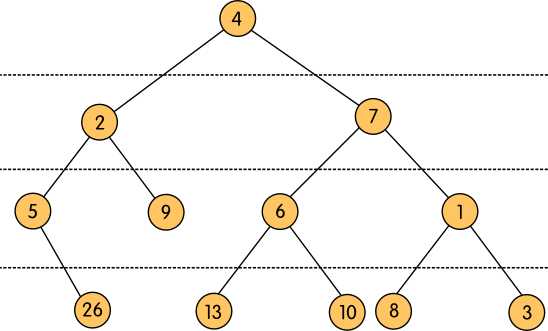
I will demonstrate how I would go with in-order traversal. Read this line by line.
- First I visit the left child: node b
- I now get into this subtree and visit the left child: 5
- Then I go to the parent node: 2
- Then I go to the right child: 9
- Then I visit the parent: node a
- Here there is no parent or children. The only thing I can do is to return the value of the single node: 4
- Then I visit the right child: node c
- I now get into this subtree and visit the left child: 6
- Then I go to the parent node: 7
- Then I go to the right child: 1
Note that 1, 2, 3 are traversal of the a, b, c nodes. All nested traversals are traversals for the nodes inside a, b and c.
An even more complicated tree could look like bellow. However exactly the same principles are valid.
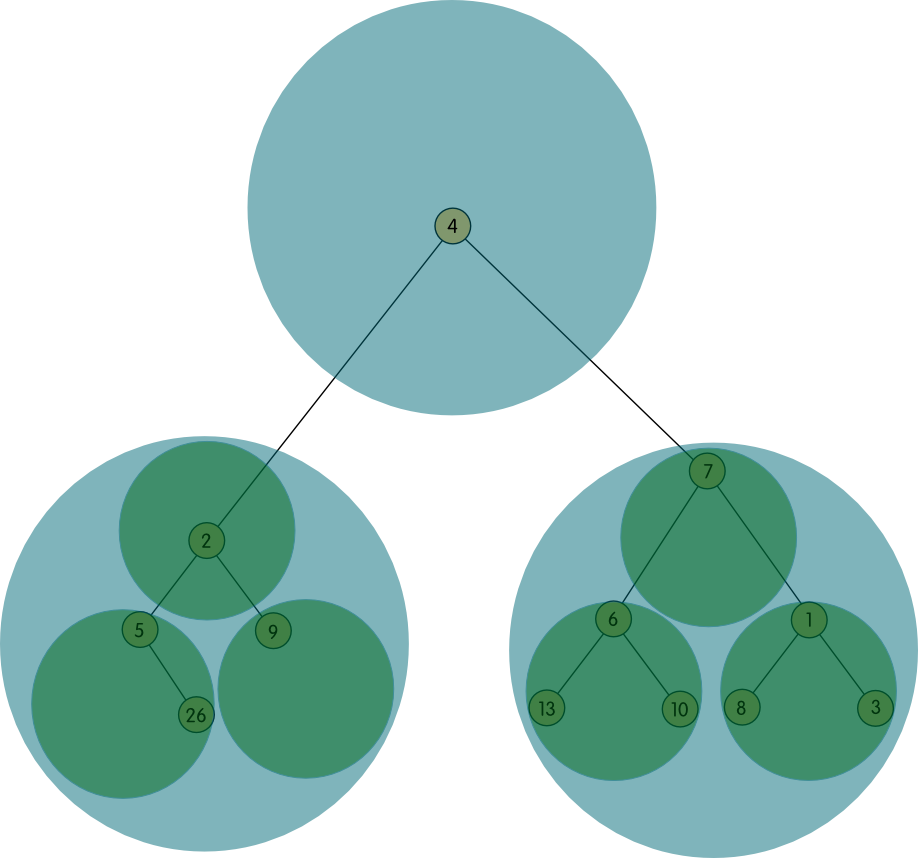
This looks a lot like a fractal, doesn't it? That's because fractals are actually based on recursion. The only difference with this example is that the recursion is not endless but instead is made of three different levels: the outer level where we see three cyan circles, the level where we see three green circles and the level where we see three nodes(inside each green circle).
Traversal by Breadth
All methods discussed earlier are actually what is called traversal by height or depth. I am not so sure as to why we call it that instead of traversal by recursion as the real difference between depth traversal and breadth traversal is:
- Height traversal uses recursion.
- Breadth traversal is linear, going from one node to the next as you see the whole tree.
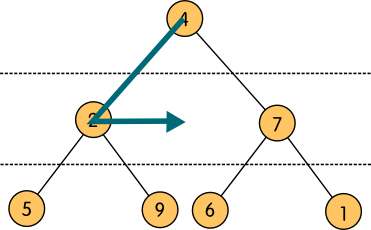
Traverse by level
Traversing by breadth or by level(which is more intuitive) is the simplest method to traverse a tree. You can see the nodes of an arbitrary tree grouped into different levels depending on how close to the root they are. In the bellow tree I have numbered the different level of nodes:
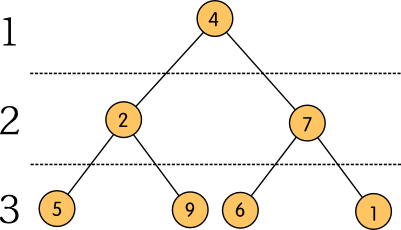
Node with value 4(the root) belongs to level 1. Nodes 2 and 7 belong to level 2. Lastly, nodes 5, 6, 9 and 1 belong to level 3.
To traverse the tree with traversal by level we just go from left to right on each level jumping from node to node like this:
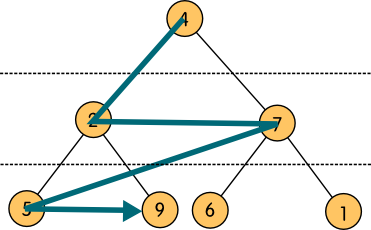
Thus we traverse the nodes in this order:
[sourcecode light="true"]
4, 2, 7, 5, 9, 6, 1
[/sourcecode]
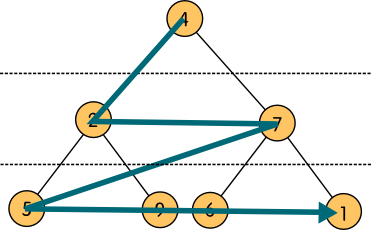
If the tree would be more complicated or not complete(missing nodes at some level) then we just jump over the missing nodes and get to the next one. An example follows bellow.

The nodes visited in order:
[sourcecode light="true"]
4, 2, 7, 5, 9, 6, 1, 26, 13, 10, 8, 3
[/sourcecode]