You should be able and understand why people put hex in the code instead of raw binary (if it exists for that programming language). There are very specific reasons for doing this and since converting from hex to binary is so damn easy, there is no excuse for you to not be able and do it in your brain.
Binary and LED patterns
I was building a trivial LED matrix the other day for an MBED microcontroller (think Arduino-like). The usual problem is that my brain is faulty so I do all sorts of things in the wrong way. I take this blog as the opportunity to make up for what I learn just to make sure that I won't forget (and ofcourse to teach others if they are interested).
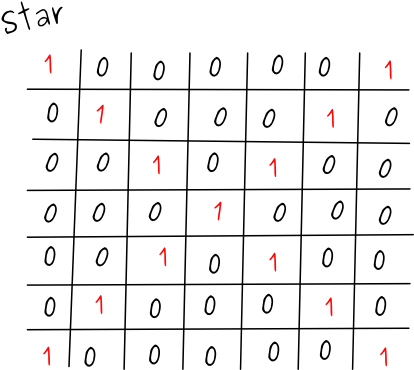
So my task was to achieve some patterns with 9 LEDs. Notice that it doesn't matter how the microcontroller was connected etc. since here I am only dealing with how bits and bytes fit into low level programming. My first pattern was a rotating star that you can see below:

This star is made out of two LED patterns: a star and a cross.

The 1s and 0s simply mean if the LED at a position should be turned on or off. Now, when we're dealing with low level things the minimum unit of information that can be sent is 1 byte (= 8 bits). In our case we have 9 LEDs so we need however a minimum of 2 bytes (= 16 bits). The above examples become the below binaries:
Star:  0000000101010101
Cross: 0000000010111010
Now, the problem is that when we deal with low level programming, most low level languages (C, C++ etc.) don't let you write numbers as binary in your code. You can't write
printf(0b101) for example. You need separate libraries if you want to do that and that would be fine for our case. But imagine if there was a matrix of 100 LEDs. Someone reading printf(001001010101101010101010101010101110101001011100101) would just get lost in the 0s and 1s. That's one of the big reasons hex is used - it's super minimal.Binaries as integers
At first when I wanted to create a star, I simply converted each binary to an integer and just put it in my code. Below you can see a simplified version of my code.
[sourcecode lang="C" gutter="False"]
..
#define STAR 341
#define CROSS 186
int main() {
while (1) {
leds.write(CROSS)
sleep(1)
leds.write(STAR)
sleep(1)
}
}
[/sourcecode]
The way I found those integers was by simply using Python. It is a rather trivial procedure:
[sourcecode lang="Python" gutter="False"]
>>> 0b101010101
341
>>> 0b10111010
186
[/sourcecode]
Notice that I omit the extra 0s since they don't add any value just like 000150 is always going to be 150 no matter how many zeros you add at front.
Binaries as hex
The code I used, worked fine. The problem with this solution is that it's impossible to have a clue what an integer is in binary - and when we deal with low-level programming that matters most of the times. In our case for example each single 1 and 0 controls one LED. Being able to figure out fast the binary of a number in this case is very important.
For example say you find the code snippet below somewhere:
#define STAR1 341
#define STAR2 186
How can you tell if it's the STAR1 or STAR2 that looks like an 'X'? It's just impossible. And what if there were many more stars or if the LED matrix was huge? Then it would be a nightmare to understand the code. That's where hex comes in handy.
The good thing with hex is that someone can see the hex and decode it to binary in his brain. So say we had the above example but instead of integers had hex values:
#define STAR1 0x155
#define STAR2 0xba
A skilled programmer would directly see 0001 0101 0101 and 0000 1011 1010 with no effort. And he wouldn't either need to decode the whole number to find out. Watching just the last hex digit of each STAR would give him (or us) a hint about which STAR is which.
It's time we become that skilled programmer, don't you think?
Hex to binary in da brain
Fortunately it is very simple to convert hex to binary in the brain. You simply have to understand that each hex number is made out of 4 bits since we need a max of 4 bits to represent the largest number in base 16 (which is the character 'F'). So 0xF is 0b1111. (Notice that putting 0x in front denotes that the number is in hexadecimal represation and putting 0b denotes the binary representation accordingly.)
The procedure of binarizing a hex is simple:
- Find the binary of each hex character
- Place 0s in front of each binary (from above) so we always have 4 digits
- Squeeze them all together as if they were strings
So for example:
F   is       1111
5   is       0110
FF  is  1111 1111
55  is  0110 0110
5F  is  0110 1111
F5  is  1111 0110
Hopefully you get the hang of it. The question is.. what happens if we have 0x102? This might seem tricky since we get three very simple binaries: 1, 0 and 10. But as I said, if you add the 0s in front before you squeeze them together, you should get the correct value - in this case 1 0000 0010!
Also you need to memorise a few things to be able and do all this. I have written the bare minimum below:
Binary     Decimal
   1    =    1
  10    =    2
 100    =    4
1000    =    8
1010    =    A
1111    =    F
Then it's quite easy to find in brain all the rest. For example to find the binary of B we can simply think that A is 1010, and that since B is just one step ahead, we add 1 to it and thus get 1011. Or to find 5 we simply have to add 1 to 4 which becomes 100+1=101. And so on.
This should also make it clear what the command
chmod 777 in Linux does.Big fat hex stars
The below is more like an exercise to test what we've learned. It should be rather simple to find the hex of the star below.
It might seem overwhelming, but the only thing you need to do is go in groups of 4s and write down each hex value.
Grouping in 4bit groups:

Decoding the above becomes 8388A08388A0 which is WRONG.
Row 1: 8 3..
..
Row 7: ..A 0 (and a remaining 1?!)
This was actually a trap to teach you the hard way that we should always start from the last digit. In this case in the end we are in a situation where we have an orphan digit 1. We can't work with that since we need 4 digits to make a hex number.
The right way is to always start from the end. This is for all numbers no matter if they are represented in binary, octal, hex, decimal or whatever - as long as they are numbers, always start from the last digit and you'll do fine. The reason is that when you finally get to the last number you can add as many zeros as you like (or need) without altering the value of the whole thing.
So the correct grouping is this (starting from bottom-right):

And then we just start from the bottom and get 1051141051141! Notice that in the end we again have a single 1 (at the top left this time), but this time we can add as many zeroes as we want since adding zeros in front of a number doesn't change its vallue.
We can also validate what we got with Python:
[sourcecode lang="Python" gutter="False"]
>>> bin(0x1051141051141)
'0b1000001010001000101000001000001010001000101000001'
[/sourcecode]