In practise this method is being used to test things. If you are developing a web-server for example it would be easy if you could test your web-server directly without having to launch a browser and type a command. It's a blessing for automation.
Here we will try to send an email by using the SMTP protocol. We will use telnet for that, by sending and receiving raw messages with the SMTP server.
Preparation
First we need to install telnet with SSL support. All SMTP servers use SSL encryption nowadays so using simply telnet will not work. The telnet shipping with Ubuntu does not support SSL so we need to upgrade it:
sudo apt-get install telnet-sslTo run the new telnet-ssl we just issue telnet in the terminal as before. The difference is that telnet now supports some new flags, namely -z, which is used for SSL.
We are also going to need http://www.base64encode.org to encode our username and password to base 64 format. Keep in mind that base 64 does not encrypt a message. It just changes the way the information is stored. In practise we use base 64 to be able and send any kind of data as simple characters. The real encryption is under the hood however. Check Extras for more info.
Steps
- Start telnet
- Handshake with server
- Login on gmail
- Username
- Password
- Email sender
- Email recipient
- Email body
- Close telnet
telnet -z ssl smtp.gmail.com 465The flag -z ssl tells telnet to use SSL over the connection. smtp.gmail.com is Gmail's server domain and 465 is the port used by the server.
HELO yoThe text after the HELO is supposedly your domain or literal address. Essentially you can enter whatever you want. Pressing enter, the exact message arrives at the mail server, which in response should reply with
250 mx.google.com at your serviceAUTH LOGINThis message is self-explanatory. After the server receives this message, it's going to ask for our username. The response looks like this
334 VXNlcm5hbWU6 and indicates that the username should be entered.Go to http://www.base64encode.org and encode your username (username@gmail.com) to 64 base. Copy and paste the encoded string in your telnet session and hit enter. If the username is accepted, you get back the message bellow.
334 UGFzc3dvcmQ6This message indicates that the password should be entered.
Do the same as above but instead of your username, encode your password. Then paste the password and hit enter. If the username/password combination is correct, you are greeted with the message
235 2.7.0 AcceptedFirst we are going to add the sender of the email:
MAIL FROM: <username@gmail.com>For gmail it doesn't really matter who you set as sender. We logged in our gmail account when we sent the AUTH LOGIN message to the server. Gmail has as a mechanism to set the sender automatically to your email address.
The response back is
250 2.1.0 OK js17sm40481494lab.5 - gsmtpNow we will add the recipent of the email. Here we need to provide a valid email or else the email will not go any further. If the email doesn't exist, we will probably get it back into our inbox which is the default behaviour for undelivered emails.
RCPT TO: <username@gmail.com>On success we get
250 2.1.5 OK js17sm40481494lab.5 - gsmtpNow we want to start typing the email. We send the following command to the server so that the server knows that what follows is the actual email.
DATAThe response from the server is
354 Go ahead js17sm40481494lab.5 - gsmtpNow we need to set the subject(if we want).
Subject: testand everything else following is considered the text of the email
This is a line in the email.
This is a second line in the email.
.
The dot on its own line in the end is to signal the end of the email. After that, a response from the server should come:
250 2.0.0 OK 1381416452 js17sm40481494lab.5 - gsmtpNow the email has been sent.
QUITThis is an actual command to the telnet client and not a message sent to the mail server.
Extras
EHLO vs HELO
EHLO can be used instead of HELO. The difference is that EHLO lists also all the commands that the server supports. EHLO is newer than HELO and is suggested to be used instead of EHLO. However HELO is always going to be supported, so in reality there is no big difference as long as the server supports the message.
SSL and encryption
Something important, as mentioned in the beginning of this page, is that encoding data to base 64 is not encryption but rather a different representation of the same data. It's SSL which adds the encryption to our communication and you can be assured that everything is encrypted between the client and the server.
I captured the whole procedure of sending an email, with Wireshark to prove my point.
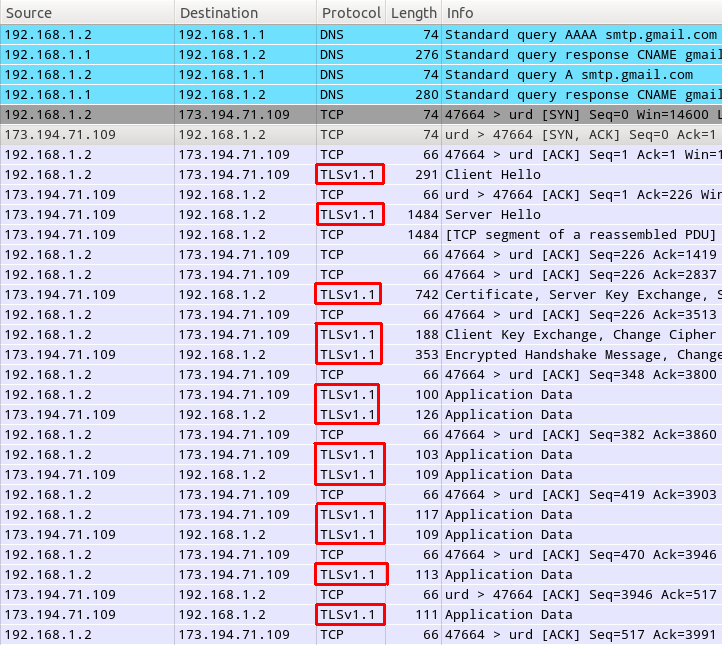
The packets are in the order they were sent and received. We can see that telnet first contacts the DNS server to get the domain name of the mail server. 192.168.1.1 is my router and 192.168.1.2 is my computer from where I use telnet.
After we get the domain we do a first handshake with the mail server. It's those three TCP messages with SYN/ACK in them. After that we initiate a TLS session. TLS and SSL are pretty much the same thing. They are just different versions for encrypted communication, with TLS being the newer one.
Everything we type and read from the time we start telnet is encrypted. The reason we see the messages clearly in the terminal is that they get decrypted by telnet on their arrival. When messages leave telnet, they get encrypted to travel on the wire. That's why with Wireshark we only see the decrypted data, because we are looking at what is passing through the wire. I circled the TLS messages to make it more apparent that the whole session is encrypted by using TLS. The few TCP packets seen here and there, are packets with encrypted data. If you could check what these packets hold inside(with Wireshark), you would only see gibberish.
If instead of Gmail we were using an SMTP server that doesn't use SSL, we would be able to intercept all the packets with their raw data, and thus the actual messages, passwords, usernames, etc.