Wednesday, August 20, 2014

Keys, SSH and not typing passwords

SSH Keys


When you login to a remote computer it will each time ask for a password, something that can become tedious. For that reason we can use keys, small pieces of information (essentially strings) on each computer that are used for each computer to identify the other and acknowledge that they are who they say they are.

You need to create two keys for this. One key will be stored on the server - the computer you try to connect to. The other key will be stored on your computer.

The first key, the one that the server holds, is called the private key and there is only one. The other key that we hold is called public since there can be many copies of this key to many other computers. The two keys are heavily dependent on each other. If one changes, then the other won't work.

But let's how all this looks in practice..


From the machine you are trying to connect from


ssh-keygen -t rsa -b 4096


This creates a key based on algorithm RSA with length 4096 (default is 2048). The longer the key, the harder to break but on the downside it takes a bit more time to authenticate (more CPU usage).


Generating public/private rsa key pair.
Enter file in which to save the key (/home/a/.ssh/id_rsa):
Enter passphrase (empty for no passphrase):
Enter same passphrase again:
Your identification has been saved in /home/a/.ssh/id_rsa.
Your public key has been saved in /home/a/.ssh/id_rsa.pub.


That should generate two keys:


  1. ~/.ssh/id_rsa - a private key that is unique to the machine and if lost, security is breached

  2. ~/.ssh/id_rsa.pub - a public key, that can be visible to anyone, without any security impact


The passphrase is similar to a password and is added to the key for extra security. In case your private key gets stolen, you should have a little time to change all keys on the systems.


At the server you are trying to connect to


In order to connect from the machine where we created the keys, to a remote server we need to configure the server and let it know that he can trust the x machine with public key y. From the previous example that key is the id_rsa.pub

On the server machine we need to append that id_rsa.pub, since it's public, there is no problem if we send it with an email or even the insecure telnet. Once we have the id_rsa.pub string on the server, we append it to ~/.ssh/authorized_keys


cat PATHTOKEY/id_rsa.pub >> ~/.ssh/authorized_keys


You can even add it manually with a text editor if you happen to have the public key as a string (from an email for example).

Now you can add that to more than one servers since it's a public key. The id_rsa should stay secure on your machine while the id_rsa.pub can be stributed to the machines you are trying to connect to.


The droplet way (digitalocean)


Now there are some graphical ways to do so without dwelling inside your machine but I think it's easier to do it manually now that we got an idea of how it works with ssh keys. The easiest way to add a key is with this command

cat ~/.ssh/id_rsa.pub | ssh root@xxx.xxx.xxx.xxx "cat >> ~/.ssh/authorized_keys"

where xxx.xxx.xxx.xxx is the IP of your droplet. Once that is succesfull, you would be able and ssh to your droplet without any password asked.


Troubleshooting


Known_hosts error


Trying to ssh to your droplet gives:

@@@@@@@@@@@@@@@@@@@@@@@@@@@@@@@@@@@@@@@@@@@@@@@@@@@@@@@@@@@
@    WARNING: REMOTE HOST IDENTIFICATION HAS CHANGED!     @
@@@@@@@@@@@@@@@@@@@@@@@@@@@@@@@@@@@@@@@@@@@@@@@@@@@@@@@@@@@
IT IS POSSIBLE THAT SOMEONE IS DOING SOMETHING NASTY!
Someone could be eavesdropping on you right now (man-in-the-middle attack)!
It is also possible that a host key has just been changed.
The fingerprint for the ECDSA key sent by the remote host is
b9:75:ff:10:fa:42:f1:b7:6f:d2:1f:8e:f4:f7:1a:cd.
Please contact your system administrator.
Add correct host key in /home/a/.ssh/known_hosts to get rid of this message.
Offending ECDSA key in /home/a/.ssh/known_hosts:6
remove with: ssh-keygen -f "/home/a/.ssh/known_hosts" -R 178.62.200.200
ECDSA host key for 178.62.200.200 has changed and you have requested strict checking.
Host key verification failed.


The reason we get this message is that we erased the droplet and created a total new. However our computer has stored the key of the older droplet. A fast fix is to simply erase all known_hosts:

rm ~/.ssh/known_hosts


Droplet password doesn't work


Check first if you got an email with a new password. If not, reset your password for the specific droplet following digitalocean's guidelines.

Wednesday, August 6, 2014

Docker talking to docker

The problem


If you are mingling with docker and containers on servers, you'll at some point want to have two containers communicate with each other.

For example if you have an Apache server, Django+Python and a MySQL server and you want to do tests on different configurations/versions of these, you should probably go the container-way: putting each of them on their own container. However since all these services are interchanged in some way (database has to communicate with web server, apache server has to communicate with django), the containers have to talk with each other somehow.


Possible solutions


There are essentially four ways to accomplish container-to-container communication:


  1. Having containers inside containers

  2. Using volumes (shared folders)

  3. Mapping ports (communication over TCP/IP)
  4. Linking containers (communication over.. TCP/IP?)


I will completely omit the first way since it's a brainfuck both conceptually and technically (yes, I am aware of Dind). Been there, done that, and it wasn't pretty.

The second solution is about sharing folders between host and container or between containers by using docker's --volume flag. This is practical when you want to share files (source code, configuration files etc.) on a local machine. If you want containers on different hosts to communicate however this won't suffice.

The two remaining solutions is the meat I will try to break down for you (and minimize your flatulence from the learning curve). I did my research and I will do my best to convey what I came down to. But enough talk, let's start!


Terminal to terminal speaking


I will use netcat to show how all these things work. To remind you, netcat is a Unix tool similar to cat but supposed to work on the network (thus the name net-cat). Practically it's used when you have to copy/paste from host to an other host, chat with someone fast, or just test communication between two hosts like we do here.

You can test it on your home computer. Open two terminals and type in one of them
[code]netcat -l 8000[/code]

and on the other
[code]netcat 127.0.0.1 8000[/code]

Whatever you type on one terminal now, will appear on the other one.


Terminal to container speaking


Let's take this a step further, by containerizing the listening netcat. In a new terminal type:

[code]docker run -i -n -p 9000:2000 ubuntu netcat -l 2000[/code]

that creates a new container with an internal port 2000. The port 9000 is the port on our system. Whatever arrives to that will automatically be forwarded to our container's port 2000. This is somehow similar to port forwarding on home routers. (I explain more on how this actually works later.)

The flag -n is a deprecated flag for networking. In practice without the -n flag, everything will work as before but for some weird reason there will be an initial lag for the first netcat message. So if you don't use it, just wait a bit longer.

text3782

We should now have a container running a "listening" netcat. Let's open a terminal (on the same host) to try and talk with it:
[code]netcat 127.0.0.1 9000[/code]

Or from a different host:
[code]netcat <computer IP> 9000[/code]


Keep in mind that different containers on the same machine can have the exact same internal IP but not the same system one. So you can create a bunch of containers as long as you change the system's IP:

[code]
docker run -d -p 9000:2000 ubuntu netcat -l 2000
docker run -d -p 9001:2000 ubuntu netcat -l 2000
docker run -d -p 9002:2000 ubuntu netcat -l 2000
[/code]

It's all legit baby!


Container to container speaking


We take this a step further by having the listening container as before but instead of opening a terminal to connect to it, we will create a new container on a different host.

text3783

So create a new container on the first host (same command as before)

[code]docker run -i -p 9000:2000 ubuntu netcat -l 2000[/code]

Then we create a new container on the second machine (or same):

[code]docker run -i -t ubuntu bash
root@879ad5d4251a:/#[/code]

On the new prompt that we get we can netcat directly to the first host:
[code]root@879ad5d4251a:/# netcat 10.2.202.156 9000[/code]

This should work as a charm as long as you use your LAN IP.

There are some weird networking behaviours. For example if you netcat by using the IP of the container (eth0 inside container) there is an initial lag but after some seconds the message arrives. The same behaviour occurs if you omit the -n flag but use the LAN IP (which otherwise works). If I start a bash session in the container and listen to 9000 with netcat there, then it works flawlessly. Weird stuff indeed.


A whole network under the city


I omitted quite some information in an effort to jumpstart you. This information is however crucial if you want to use port forwarding and container communication on different hosts. There's a concept that will save yourself some headaches:

There is a whole virtualized network when we use Docker.

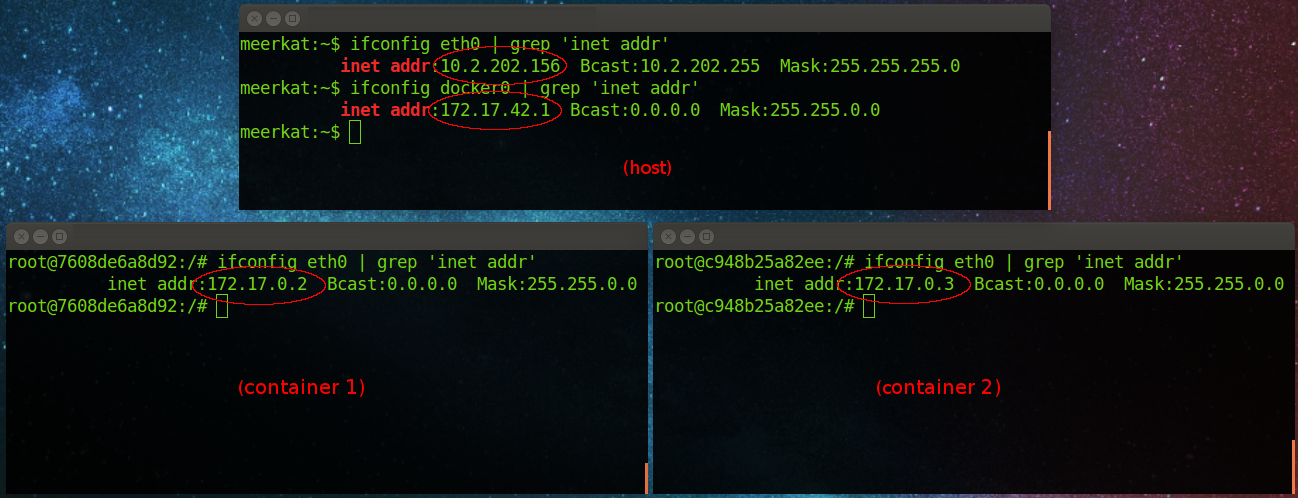
Let me prove that to you. I create two containers and then I check the IPs of them and the IPs of the host. I do that by running ifconfig on each terminal.

docker_IPs_internal

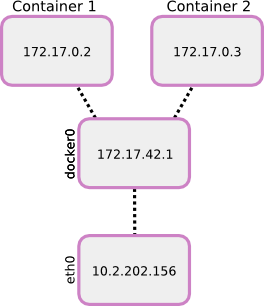
Putting it all down sums up to the below picture.

docker_virtual_network

You see, Docker creates a virtual IP for each container we create. Furthermore on our host we have a virtual interface called docker0. That can be considered the router. Now on the same host we are able to communicate with any container if we know their IP.

Now, if a container is listening on a specific port we are able to communicate with it by knocking on its door with a pair of IP address and port number.

Let's use this new knowledge on the previous example with netcat. Let's assume that container 1 is listening on internal port 2000 and system port 9000 (like before):
[code]docker run -i -p 9000:2000 ubuntu netcat -l 2000[/code]

We can connect to it in all these ways:

[code]
netcat 172.17.0.2 2000
netcat 127.0.0.1 9000
netcat localhost 9000
netcat 10.2.202.156 9000
[/code]

The significant information here is that we can directly speak to the container if we know its IP. Pay attention also to that we need to use the correct port in that case.


Container to container speaking via links


So what are those so called links? Nothing special actually. It's just some variables passed from one container to an other. In most cases these variables will hold things like IPs, ports, etc. Thus it's just a step of simplifying things for us - in the end we will probably just use these variables to connect as before.

Let's see how it works. Start by creating a first container that will act as a server:

[code]docker run -i -t -p 8000:8000 --name myserver ubuntu bash[/code]

and then a second container that will act as a client:

[code]docker run -i -t --name myclient --link myserver:myserver ubuntu bash[/code]

Nothing special huh? Well the magic happens if you inside the client (second container) run:

[code]root@3b00d48e549a:/# ping $MYSERVER_PORT_8000_TCP_ADDR[/code]

You will successfully ping the other container. $MYSERVER_PORT_8000_TCP_ADDR is simply a variable set by docker on the newly created container, the one with the --link flag. You can see all variables with the command env. Depending on what flags you passed to the container, you will see appropriate things. In practice, if you don't use the -p flag, you won't see anything interesting (useful).

The --name flag is needed when we use linking as we need an identifier for the container. When we do the linking we need pass the name of the other container, the one that we want to link to and an alias for it. The alias is used merely as a prefix for the variable names. For example if we used --link myserver:dingdong instead of --link myserver:myserver then the variable above would be $DINGDONG_PORT_8000_TCP_ADDR.

That's pretty much all to linking! By using these variables you can get the IPs and ports of other containers on the same host. That's an important annotation. You can only link to a container running on the same hosts. For communicating to containers on distant hosts you'll need to use port mapping as explained earlier.

Useful commands


Show which ports are opened by docker
[code]sudo netstat -tulpn | grep docker[/code]